Python Environment Isolation
This page explains how to install Miniforge3 on the lab server and use conda to create isolated Python environments for different experiments.
Do not rely on the system Python for experiments. Use a separate environment for each project. Prefer conda for dependency management.

Miniforge or Miniconda?
This guide uses Miniforge3 consistently. Miniforge uses conda-forge by default, while Miniconda uses Anaconda's default package channels. Both are lightweight Conda distributions, but this guide chooses Miniforge because it is community-developed and avoids commercial licensing concerns.
If your computer already has Miniconda installed, you do not need to replace it immediately. Most conda commands still apply.
Do not install both Miniforge and Miniconda at the same time, and do not casually mix different package channels in the same environment.
If you are not sure which one to use, use Miniforge.
1. Why Environment Isolation Matters
Different experiments may require completely different Python and package versions. For example:
project-a needs Python 3.10 + torch 2.4
project-b needs Python 3.11 + torch 2.6
project-c needs an older numpy
The correct habit is: one project corresponds to one conda environment.
2. Check the Default Server Environment First
After logging in, first check the environment:
uname -m
cat /etc/os-release | sed -n '1,8p'
python3 --version
python3 -m pip --version
command -v conda
conda --version
For a default server environment, log would like:
x86_64
Ubuntu 24.04.3 LTS
Python 3.12.3
/usr/bin/python3: No module named pip
conda: command not found
This means the server has a system Python, but Miniforge / conda is not prepared by default. The system Python is for the operating system, and regular users do not have permission to modify it.
Do not modify system Python
Do not use system Python as your experiment environment. Regular users do not have sudo permission. Experiment dependencies should go into your own Miniforge / conda environment.
If you type pip directly, you may see a message like:
コマンド 'pip' が見つかりません。次の方法でインストールできます:
apt install python3-pip
管理者に確認してください。
This means the system-level pip command is not installed. For experiment users, the right solution is not apt install python3-pip, but installing and using your own Miniforge.
3. Install Miniforge
Miniforge is a lightweight conda distribution that uses conda-forge by default. Compared with the full Anaconda distribution, it is a better fit for personal experiment environment management.
Install it under your home directory:
~/opt/miniforge3
Download the installer:
mkdir -p ~/opt
cd ~/opt
curl -L -O https://github.com/conda-forge/miniforge/releases/latest/download/Miniforge3-Linux-x86_64.sh
Run the automatic installation:
bash Miniforge3-Linux-x86_64.sh -b -p ~/opt/miniforge3
Check the result:
~/opt/miniforge3/bin/conda --version
~/opt/miniforge3/bin/python --version
If you see output like this, the installation succeeded:
taro-yamada@Ubuntu:~/opt$ ~/opt/miniforge3/bin/conda --version
conda 26.3.2
taro-yamada@Ubuntu:~/opt$ ~/opt/miniforge3/bin/python --version
Python 3.13.13
4. Enable conda
After installation, the current shell may not know where conda is. Load it manually first:
source ~/opt/miniforge3/etc/profile.d/conda.sh
Then check:
conda --version
5. Should You Write It into ~/.bashrc? Recommended
If you want to use conda activate directly every time you log in, run:
~/opt/miniforge3/bin/conda init bash
Then open a new SSH terminal, or run:
source ~/.bashrc
It is recommended to disable automatic activation of base:
conda config --set auto_activate false
Older conda command:
conda config --set auto_activate_base false
This keeps your terminal cleaner because (base) will not appear automatically after login.
For beginners, running conda init is recommended. If you do not want to modify ~/.bashrc, you can also manually run this line every time:
source ~/opt/miniforge3/etc/profile.d/conda.sh
6. Create a Project Environment
It is best to keep the environment name consistent with the project name. For example, if the project is called nerf-room1:
conda create -n nerf-room1 python=3.11 -y
conda activate nerf-room1
Confirm where the current Python comes from:
which python
python --version
The output should look similar to:
(nerf-room1) taro-yamada@Ubuntu:~$ which python
/home/taro-yamada/opt/miniforge3/envs/nerf-room1/bin/python
(nerf-room1) taro-yamada@Ubuntu:~$ python --version
Python 3.11.15
Do not install dependencies into base
base should only provide environment management tools such as conda. Dependencies needed by training code, such as torch, tensorflow, opencv, and numpy, should go into the project's own environment.
7. Install Project Dependencies
Prefer conda for complex dependencies:
conda install numpy pandas matplotlib -y
If the project provides requirements.txt and you have already activated the project environment:
python -m pip install -r requirements.txt
If you only need to install one temporary pip package, still prefer:
python -m pip install package-name
This ensures that pip belongs to the currently activated Python environment.
Do not run pip install outside an environment
Do not run pip install before activating the conda environment.
Do not run pip install before activating the conda environment.
Do not run pip install before activating the conda environment.
8. Use a Specific CUDA-Toolkit Version in a conda Environment
The lab servers are shared by multiple users. Do not try to install or modify CUDA at the OS level yourself. Global changes to /usr/local/cuda, system environment variables, or driver-related components may affect experiments that other students are currently running.
A safer approach is to install the CUDA runtime, CUDA Toolkit, or deep learning framework CUDA version required by your project inside your own conda environment. This allows different projects to use different CUDA-related dependencies without modifying the system-wide environment.
First distinguish several concepts
- "NVIDIA Driver / GPU driver" is a system-level component and is maintained by the administrator. Whether
nvidia-smican show the GPU normally mainly depends on the driver. - "CUDA Runtime" is the user-space library required to run already compiled CUDA programs. Many PyTorch / TensorFlow installation packages basically include it.
- "CUDA Toolkit" is the complete toolkit for development and compilation. It usually includes header files, libraries, debugging / profiling tools, and compilation-related tools such as
nvcc. - "
nvcc" is NVIDIA CUDA Compiler Driver. It is used to compile.cufiles, CUDA extensions, or packages that require local CUDA compilation. When you only train and infer PyTorch models, you usually do not need to installnvccseparately.
Do not install CUDA into base
NVIDIA also officially recommends installing CUDA in a dedicated conda environment instead of the base environment. CUDA / PyTorch / Python versions often differ between experiment projects. Mixing them into base makes later debugging difficult.
8.1 When You Need to Install What
If you only need to install frameworks such as PyTorch or TensorFlow, usually check the framework's official installation page first. For example, PyTorch will let you choose Linux, installation method, Python, and CUDA version, and then generate the corresponding command. In this case, you generally do not need to install a system-level CUDA Toolkit first, and you do not necessarily need nvcc.
If an installation package says it cannot find nvcc, or if the project README explicitly requires a specific CUDA Toolkit version, you need to install CUDA Toolkit to compile CUDA code.
If the error only says nvcc is missing, you can first try installing only cuda-nvcc.
8.2 Where to Check CUDA Versions
Generally, you can use the NVIDIA official site NVIDIA CUDA Toolkit Archive to view official CUDA Toolkit historical versions, release dates, and corresponding documentation.
You can also use the Conda official site cuda-toolkit labels on Anaconda.org to view CUDA labels available for conda packages, such as cuda-11.6.2 and cuda-12.4.0.
If you want to install nvcc separately, please read cuda-nvcc on Anaconda.org.
Relationship between version numbers and conda labels
When installing older NVIDIA CUDA packages with conda, a common pattern is to write the version in the channel label, for example -c nvidia/label/cuda-12.4.0. This label should match a label listed on Anaconda.org.
8.3 Recommended Installation Method: Install Inside the Project Environment
For example, create an environment that needs CUDA 11.6:
conda create -n cuda116-demo python=3.10 -y
conda activate cuda116-demo
The official NVIDIA conda installation instructions are in CUDA Installation Guide for Linux: Conda Installation. On lab servers, prefer installing inside the project's own conda environment.
Common NVIDIA conda packages can be understood like this:
| Package | Suitable situation | Explanation |
|---|---|---|
cuda-toolkit |
You need a relatively complete CUDA Toolkit | Contains common CUDA development tools, header files, and libraries. |
cuda |
The project README or official NVIDIA command explicitly requires it | A meta-package used in NVIDIA official documentation to install a group of CUDA Toolkit components. |
cuda-nvcc |
The error only lacks nvcc, or you only need the CUDA compiler |
Smaller than the complete Toolkit; if header files or libraries are missing later, install cuda-toolkit. |
If you need a relatively complete CUDA Toolkit, you can install cuda-toolkit:
conda install -c nvidia/label/cuda-11.6.2 cuda-toolkit
If the project README directly requires an official NVIDIA conda CUDA package, you may also see the cuda meta-package. It installs a group of CUDA Toolkit components:
conda install -c nvidia/label/cuda-11.6.2 cuda
If the error only lacks nvcc, you can first install the smaller cuda-nvcc:
conda install -c nvidia/label/cuda-11.6.2 cuda-nvcc
Which package to install should be decided first by the project README, course instructions, or error message. Generally speaking, if you only run PyTorch / TensorFlow, use the framework's official command to install the framework first, and do not install Toolkit first; if you need to compile .cu or CUDA extensions, install cuda-toolkit first; if the error only lacks nvcc, you can first try installing only cuda-nvcc. When you need a complete CUDA development environment, install cuda-toolkit or the cuda meta-package explicitly required by the project.
8.4 Verify CUDA and nvcc in the Current Environment
After installation, check:
which nvcc
nvcc -V
If you see output similar to the following, the nvcc in the current conda environment is CUDA 11.6:
nvcc: NVIDIA (R) Cuda compiler driver
Copyright (c) 2005-2022 NVIDIA Corporation
Built on Tue_Mar__8_18:18:20_PST_2022
Cuda compilation tools, release 11.6, V11.6.124
Build cuda_11.6.r11.6/compiler.31057947_0
If which nvcc points to the current conda environment, for example ~/opt/miniforge3/envs/cuda116-demo/bin/nvcc, it means you are using nvcc from this environment.
It is also recommended to check the system GPU and driver status:
nvidia-smi
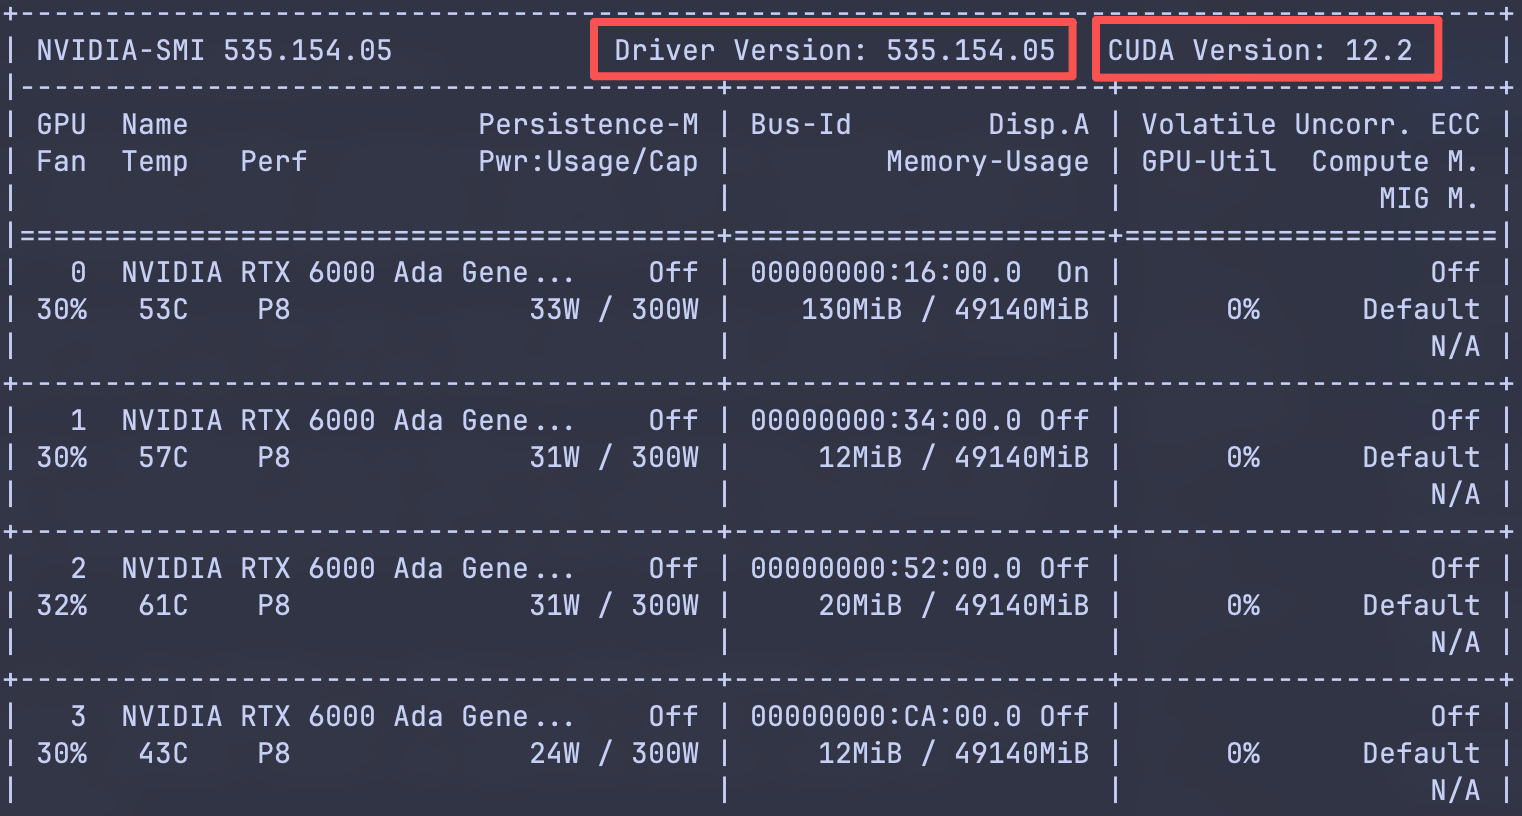
Note that the CUDA Version shown by nvidia-smi means the highest CUDA runtime version supported by the current system driver. It is not necessarily the same as the CUDA Toolkit version shown by nvcc -V inside your current conda environment. To determine the Toolkit / nvcc version of the current environment, use which nvcc and nvcc -V.
If PyTorch is installed in the current environment, you can also use Python to check the CUDA situation seen by PyTorch:
python - <<'PY'
import torch
print("torch:", torch.__version__)
print("torch cuda:", torch.version.cuda)
print("cuda available:", torch.cuda.is_available())
PY
Here torch.version.cuda means the CUDA version corresponding to the current PyTorch build, and it is also not necessarily equal to the version shown by system nvidia-smi.
8.5 Common Questions
nvidia-smi shows CUDA 12.x. Does that mean I have already installed CUDA Toolkit?
Not necessarily. The CUDA Version in nvidia-smi is only the highest CUDA runtime version supported by the driver.
What should I do with nvcc: command not found?
Confirm whether you have activated the correct conda environment:
conda activate cuda116-demo
which python
which nvcc
If there is no output, it means the current environment does not have nvcc installed.
Can I install CUDA with pip?
NVIDIA also provides pip wheels, which are suitable for some Python runtime dependencies. However, the pip method is mainly for Python package dependency management, and does not always include complete development tools. For project environments on lab servers, prefer using the framework's official command or conda installation; only use NVIDIA CUDA packages from pip when the project explicitly requires it.
What happens if the driver is too old?
If the server's system driver is too old, even if you install a newer CUDA Toolkit inside the conda environment, the corresponding GPU program may still fail to run. When you encounter this kind of problem, please contact the administrator.
8.6 Activate the Environment Again After Logging In
After logging in to the server again, reactivate the environment:
source ~/opt/miniforge3/etc/profile.d/conda.sh
conda activate cuda116-demo
If you have already run conda init bash and opened a new terminal, you can usually run:
conda activate cuda116-demo
9. Run Experiments
Before starting an experiment, get into the habit of checking:
whoami
hostname
pwd
nvidia-smi
Enter the project directory, enable Miniforge, and activate the project environment:
cd ~/projects/nerf-room1
source ~/opt/miniforge3/etc/profile.d/conda.sh
conda activate nerf-room1
which python
Then run training:
python train.py
With tmux and logs, a recommended command is:
mkdir -p logs
python train.py 2>&1 | tee "logs/train_$(date +%Y%m%d_%H%M%S).log"
For how to keep long-running experiments alive, see tmux and Running Experiments.
10. Export and Reproduce an Environment
If you want others to reproduce your experiment, export an environment file:
conda activate nerf-room1
conda env export --from-history > environment.yml
--from-history records only the packages you explicitly installed, so the file is usually cleaner.
Others can reproduce it with:
source ~/opt/miniforge3/etc/profile.d/conda.sh
conda env create -f environment.yml
conda activate nerf-room1
If the project mainly uses pip packages, you can also record:
python -m pip freeze > requirements.txt
For complex dependencies such as CUDA, PyTorch, and OpenCV, conda is usually the better choice.
11. Use with VS Code Remote SSH
After opening the project through VS Code Remote SSH, if the Python extension does not automatically detect the environment, select the interpreter manually:
Command Palette -> Python: Select Interpreter
Choose a path like:
/home/your-name/opt/miniforge3/envs/nerf-room1/bin/python
If the VS Code terminal still cannot use conda activate, run:
source ~/opt/miniforge3/etc/profile.d/conda.sh
conda activate nerf-room1
12. Disk Usage and Cleanup
conda environments can be large. A deep learning environment using several GB is common. Check disk usage regularly:
du -sh ~/opt/miniforge3
conda env list
Remove an environment you no longer use:
conda remove -n nerf-room1 --all -y
Clean downloaded package caches:
conda clean -a
13. FAQ
I Accidentally Installed Packages into base
Stop installing more packages into base. For future projects, create a project environment:
conda create -n my-project python=3.11 -y
conda activate my-project
If base has become messy, do not manually delete files inside it at random. Ask an administrator or an experienced lab member first.
Uninstall Miniforge
If you previously ran conda init bash, reverse the shell initialization first:
~/opt/miniforge3/bin/conda init --reverse bash
Then remove the installation directory:
rm -rf ~/opt/miniforge3
If the reverse command is unavailable, manually edit ~/.bashrc and remove the conda initialization block. Confirm the path before deleting anything.
References
- Princeton Research Computing: Python
- Harvard FASRC: Python Programming Language
- NIH Biowulf: Conda on Biowulf
- University of Florida Research Computing: Computation
- Yale Center for Research Computing: Jupyter Conda Environments
- conda-forge/miniforge
- NVIDIA CUDA Installation Guide for Linux: Conda Installation
- NVIDIA CUDA Toolkit Archive
- NVIDIA cuda-toolkit on Anaconda.org
- NVIDIA cuda-toolkit labels on Anaconda.org
- NVIDIA cuda-nvcc on Anaconda.org
- NVIDIA CUDA Compiler Driver NVCC
- PyTorch: Get Started Locally